Restoring Your System With System Restore
System Restore is a handy built in Windows
application that allows you to restore your system
to a previous working state. It is an ideal first
line of defense when you install a software
application and you find that your pc does not respond the way you
thought it would.
When major problems occur the first thing most
people do is panic! Admittedly there are instances
where panic is the only thing you can do but, in
most cases, there is an easier way of solving the
problem simply by using System Restore.
System Restore monitors what is happening on your
pc and periodically takes a snapshot of your systems
important files. It is from this ‘snapshot’ that
System Restore is able to take your pc back to a
specific time when the pc worked okay.
While system restore periodically takes
snapshots, you don’t have to wait for system restore
to ‘snap’ your system. You can actually create your
own system restore points as and when you wish. This
is particularly useful when you are making extensive
changes to your system or you are editing the
registry. It is worth pointing out, though, that
backing up the registry separately is always a good
idea.
Where to begin
We start by learning how to create a system
restore point and then we look at using system
restore to restore the pc to an earlier time.
Finally you will learn how to shut system restore
down and how to monitor its disk usage. But first
how do you create a system restore point?
Creating a System Restore Point
To start using system restore click on the Start
button and then click on All
Programs>Accessories>System Tools. From the system
tools drop down menu click System Restore. The
Welcome to System Restore Window will now appear
(Fig 1)
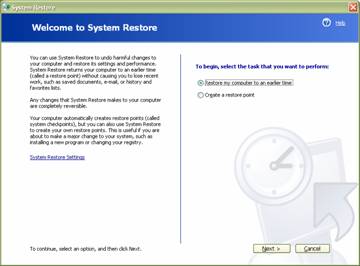
Fig: 1 Welcome To System Restore
window
The first thing you need to do is click your
mouse on the radio button next to the ‘create a
restore point’ option. You will see that a small
green dot appears inside the radio button. This
tells you that the option has been enabled. Once the
option is enabled click the Next button.
The create a restore point window will now open.
To create the restore point simply type in a
descriptive name in the system restore description
dialogue box and then press the Create button (Fig
2)
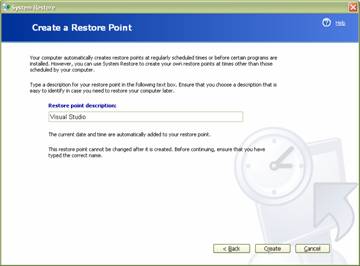
Fig: 2 Create a restore point
The system restore point in now created. Once
created the restore point created screen will
appear. All you have to do is now is click the Close
button to exit system restore. (Fig 3)
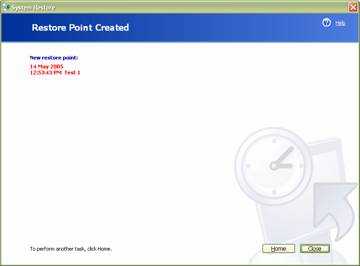
Fig: 3 Restore point created
window
A Quick Restorative
When the time comes for you to use system restore
to restore your system to an earlier time you simply
click on the Start button and then click All
Programs>Accessories>System Tools. From the system
tools drop down menu click System Restore. The
Welcome to System Restore Window will now appear
(Fig 1)
The next step is to click on the Restore my
computer to an earlier time option and then click
the Next button. The next window allows you to
select a specific date to restore your computer to.
(Fig 4)
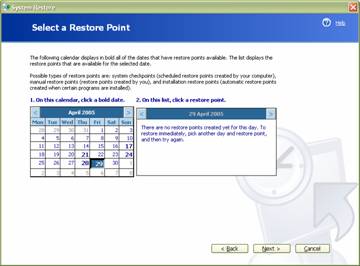
Fig: 4 Restore Point calendar
Window
As well as the system restore calendar you will
also find, in the right hand pane of the window,
either one or a number of timed events. These timed
events consist of the time a system restore was
performed or, if you have
installed one or more
applications, the time at which the install was
commenced. If you only have one system restore point
then select that. If, on the other hand, you have a
list of other application that you installed on that
day, you can select to restore your system to a
specific time. (Fig 5)
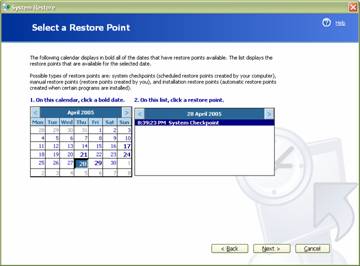
Fig: 5 Select a specific date and
time for the system restore
Once you have selected both the date and time of
the restore, click the Next button.
Your selection has now been made. All you need to
do now is confirm that the system restore date and
time are correct. From the Confirm Restore Point
Selection window you can view the details that have
been selected. If these are correct simply press the
Next button. (Fig 6)
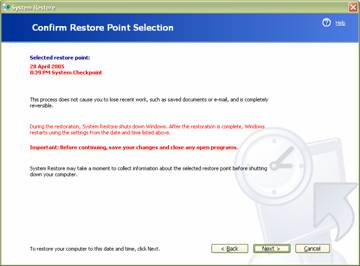
Fig: 6 Selection Confirmation
Window
Once the Next button has been pressed the system
will begin collecting information before
shutting down. As the system restarts again
a system restore progress bar will appear. This will
indicate the progress of the system restore.
Once the restore has been completed your system
will restart using the settings from the date and
time you selected. If all goes well a message will
appear informing you that the system restore was
successful. Your system has now been restored to an
earlier time. (Fig 7)
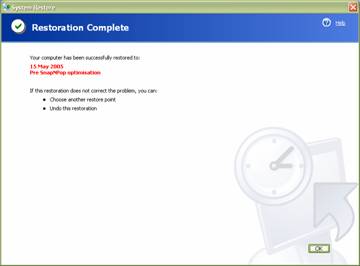
Fig: 7 Restoration Complete
Notification
While you should not loose any recently
saved documents or emails you will
loose any software that you installed after the
original restore point was taken.
Turning System Restore Off
On average system restore allocates 12% of your
disk space for system restore points, with the
minimum amount of space required being 200MB.
Anything less than this and system restore will
automatically stop monitoring your drive(s). You
don’t have to allow system restore this large amount
of room. You can easily control how much space
system restore allocates by adjusting the disk space
to use slider bar in the drive settings window
(control panel>system icon>system restore
tab>settings button) (Fig 8)
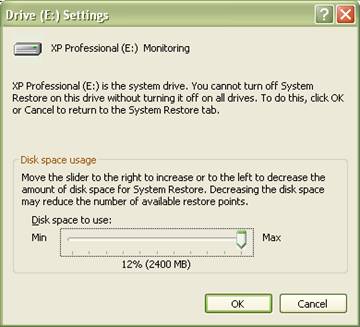
Fig: 8 System Restore disk space
monitoring
At some point the space allocation is going to be
exceeded and when this happens system restore starts
deleting restore points to grab
back valuable disk space. What normally happens in
that system restore deletes the oldest restore
points first.
There may, however, be times when you need to
physically remove all of your restore points. One
particularly good example is when your anti virus
software notifies you that you have a virus and
after deleting the virus the anti virus software
still insists that it is there. What has happened is
system restore has taken a restore point at the time
the virus entered your system and a copy is stored
in the system restore
back up file. If the anti virus software
says there is a virus in RESTOR_TMP or something
similar you can bet that the virus has been saved in
a system restore backup. The easiest and quickest
way of solving this problem is to delete all system
restore points (there is no facility of delete
individual restore points). You do this by clicking
the start button and then from the start menu
clicking the control panel option. In Control Panel
click the System Icon. This opens the System
Properties window. Next click the System Restore
tab. All you need do now is click your mouse on the
box next to the Turn off System restore on all drives option.
Finally click the Apply button for the changes to
take effect (Fig 9)
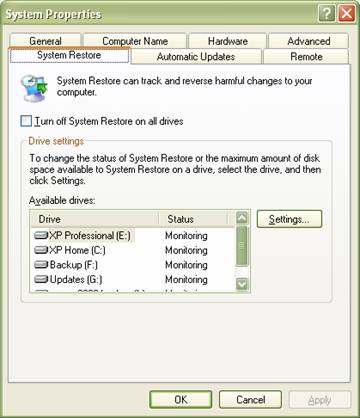
Fig: 9 System Restore tab in
System properties Windows
You can also use this option if you simply don’t
want to use system restore. If you require system
restore to start monitoring the drive(s) again,
simply remove the tick mark from the Turn off System
restore on all drives then click the Apply button
again and Windows System restore will start
monitoring your drives once more.